Mac OS X 10.10 YosemiteでApache+PHPの動作環境を設定する方法
Mac OS Xに最初から入っているApacheとPHPを使える状態にする方法です。
/etc/apache2/httpd.conf の編集
このファイルでは#が付いているのがコメント行になっています。
phpを有効にするため以下の3行のコメントを外します。
LoadModule userdir_module libexec/apache2/mod_userdir.so
Include /private/etc/apache2/extra/httpd-userdir.conf
LoadModule php5_module libexec/apache2/libphp5.so
/etc/apache2/extra/httpd-userdir.conf の編集
# Settings for user home directories
#
# Required module: mod_authz_core, mod_authz_host, mod_userdir

#
# UserDir: The name of the directory that is appended onto a user's home
# directory if a ~user request is received. Note that you must also set
# the default access control for these directories, as in the example below.
#
UserDir enabled
UserDir Sites

#
# Control access to UserDir directories. The following is an example
# for a site where these directories are restricted to read-only.
#
Include /private/etc/apache2/users/*.conf
<IfModule bonjour_module>
 RegisterUserSite customized-users
</IfModule>
/etc/apache2/users/自分のユーザーID.conf の編集
普段ログインしているID名をファイル名に.confファイルを作成します。
ファイルの内容は以下の通りです。自分のユーザーIDのところにIDを入れてください。
<Directory "/Users/自分のユーザーID/Sites/">
DirectoryIndex index.html index.php
AllowOverride All
Options Indexes MultiViews
Options +FollowSymLinks
Require all granted
</Directory>
ホームフォルダにSitesというフォルダを作る
自分のホームフォルダにSitesという名前のフォルダを作ります。
Apacheの再起動
ターミナルで以下のコマンドを入力しapacheを再起動します。
sudo apachectl restart
パスワードの入力を求められるので入力します。
確認
先ほど作成したSitesフォルダにindex.phpというファイルをつくります。
<!DOCTYPE html>
<html>
<head>
 <meta charset="UTF-8">
 <title></title>
</head>
<body>
<?php
 phpinfo();
?>
</body>
</html>
index.phpに上記PHPコードをコピー&ペーストして保存します。
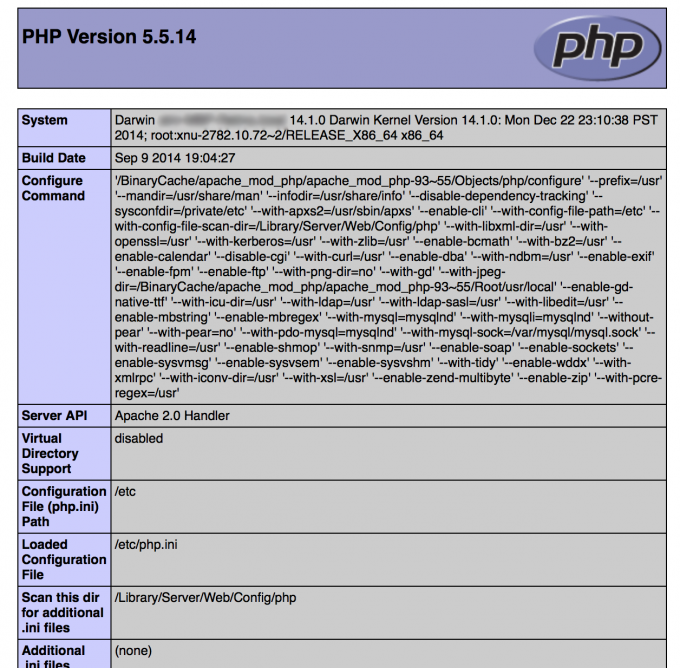
次に、ブラウザでURL欄にhttp://localhost/~自分のユーザーIDと入力します。

PHPの情報が表示されればOKです。
この記事を読んでいる人は この記事も読んでいます
- 2015年03月06日
- Blog, Web Development
- Apache, Mac, PHP


コメントを残す