gatsby-imageで画像を表示する方法
Gatsbyを使って画像を表示する方法です。dev.toに参考になる記事があったのでこちらをもとに設定しました。
yarnやnpmで必要なプラグインをインストールします。
yarn add gatsby-imageyarn add gatsby-transformer-sharp gatsby-plugin-sharp gatsby-source-filesystemgatsby-config.jsのpluginsの項目にプラグインを追記します。
   {
      resolve: `gatsby-source-filesystem`,
      options: {
        path: `${__dirname}/src/images`,
        name: 'images',
      },
    },
    'gatsby-transformer-sharp',
    'gatsby-plugin-sharp',
ターミナルでgatsby developコマンドを実行すると http://localhost:8000/___graphql にアクセスしてgraphQLを実行することができます。gatsbyのプロジェクトの中にある/src/imagesのなかに画像ファイルを入れて以下のgraphQLを実行してみます。
dev.toの記事では以下のようにファイル名だけになっていたのですが、
query {
  imageOne: file(relativePath: {eq: "画像のファイル名.jpg"}) {
    childImageSharp {
      fluid(maxWidth: 1000) {
        base64
        tracedSVG
        aspectRatio
        src
        srcSet
        srcWebp
        srcSetWebp
        sizes
        originalImg
        originalName
      }
    }
  }
}
私の環境では
imageOne: file(relativePath: {eq: "images/画像のファイル名.jpg"}) {のようにimages/というディレクトリ名を入れなければ動きませんでした。
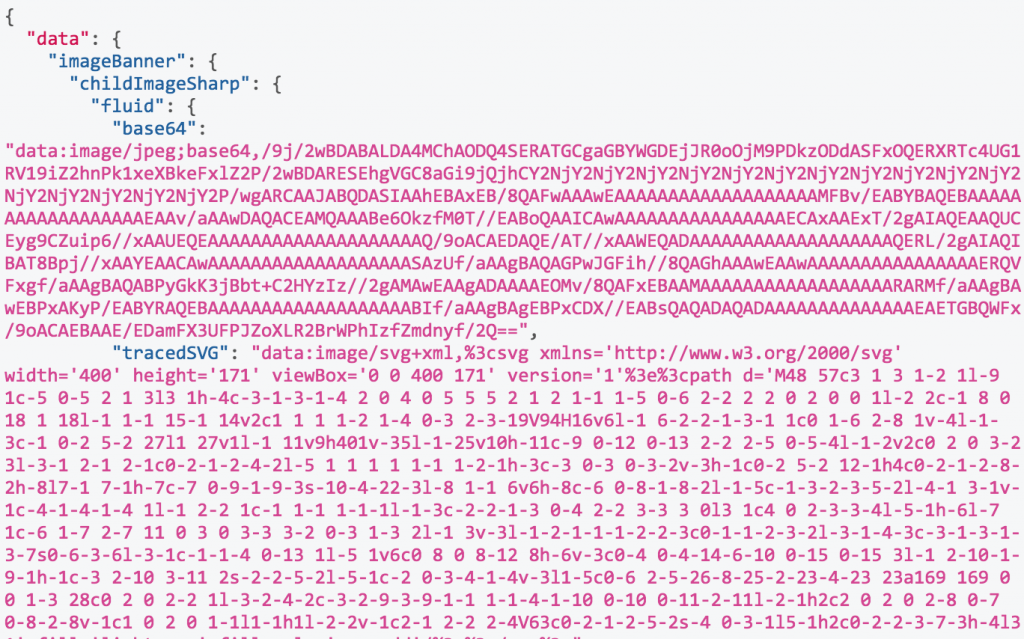
うまくいくと以下のような結果が表示されます。
画像を呼びたいページテンプレートにgraphQLを追加します。
画面によって伸縮する画像を生成します。
export const fluidImage = graphql`
  fragment fluidImage on File {
    childImageSharp {
      fluid(maxWidth: 1000) {
        ...GatsbyImageSharpFluid
      }
    }
  }
`
ファイル名をgraphQLのnodeに紐付けます(以下の例ではimages/banner.jpgがimageBannerになる)
export const pageQuery = graphql`
  query {
    imageBanner: file(relativePath: { eq: "images/banner.jpg" }) {
      ...fluidImage
    }
  }
`
実際に表示させるにはテンプレートの中で
import { graphql } from 'gatsby'
import Img from 'gatsby-image'
必要なモジュールを読み込み
const IndexPage = props => (
  <Layout>
    <Img fluid={props.data.imageBanner.childImageSharp.fluid} />
  </Layout>
)
のように指定して画像を表示されます。
- 2018年10月16日
- Blog, Web Development
- Coding, Gatsby, JavaScript, Web